Tuesday, May 29, 2012

DVD Case Re-purpose Part 2

I really loved the paper doll DVD case re-purpose and tried another idea for Mother's Day gifts. I guess you could call it a planner. I used paper and cardboard to make a pocket on one side and used spray adhesive to secure it. I also printed out little calenders, hole punched them and used a ribbon the tie them to the cardboard. Then bought some little note books and pens from the dollar store to put on the other side. I though about attaching the paper but decided that I would probably be better leaving them unattached so once the paper runs out they can be refilled.

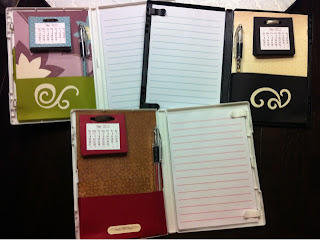
Next came the embellishments. I picked a different scheme to try and suit each person I was going to give these to, but they all have one common item which is Evey's cute face! I made her sit very still (this may have been the hardest part of the whole project) and I took a profile picture and opened it up in paint on my computer. I zoomed way in and cut out her profile. I could have stopped here because I just needed the shape of her face so I could trace it on card stock, but I may need this for another project so while I was at it I blacked out the image.

To do this is takes a few simple steps:
 
1- Copy and save colored silhouette into another document. You don't need to do this part, but once you change it to black you cannot undo it so I recommend keeping a back up.

2- Click on "Image" and  then click "Attributes" in the drop down menu

3- At the very bottom of the "Attributes" window it has an option for "Black and white" or "Colors". "Colors" will already be selected so change it to "Black and white" and click "OK". There will be a scary looking window come up warning you there is no turning back once you decide to go to "Black and white" so click "YES".


 Ta-Da, you're done. What's fun is that you can now go in and change the attributes back to "Colors" and make the image any color you want.
This would be fun to do and have printed off in a larger size for home display, and I could have done this rather than tracing on card stock, but I didn't want to use all that ink. Card stock is cheap, computer ink is not.

Here are the finished front covers. I just may need to make one for myself now.


Thursday, April 26, 2012

DVD Case Re-purpose

Finally I have gotten enough energy back to start doing something other than eating! This baby must be a boy, because only a boy could be this mean to his mother ;) This gift is embarrassingly late, but better late than never right?

When we moved here and started unpacking all of our stuff I realized that we had a HUGE heavy box packed with all our DVDs. I decided I needed to come up with a better plan because if Jared stays in the army I don't want to pack and haul this huge box everywhere we go. I already had a small CD case that held all of Evey's kid shows in it for road trips, and that gave me the idea to get a larger one for the rest of our shows. I picked up a case at Walmart that holds 300 CDs/DVDs and cut out the artwork form the cases and made this:

Sorted alphabetically by genre of course
I am very happy with it and the space it saves. The only thing that bothered me about this project was throwing away all of the plastic cases that previously held the DVDs. I just knew they could be reused somehow, but I knew I couldn't keep all 200 cases so I threw away all but the white ones. I have been hanging on to them since January, waiting for inspiration to strike. Then the other day I saw a picture on Pinterest of a DVD case made into a doodle case and the ideas started flowing! I had been wanting to make a portable dollhouse for my niece's birthday because Evey has one (store bought) that she loves, but I knew it would be a lot of work and I just didn't have the energy. Then I was inspired and came up with this:

It's a paper doll in a box! Well, it's felt doll in a DVD case. This was a pretty simple project that only required a few supplies that I already had on hand. I used a DVD case, felt, a thin cardboard box (I used a Triscut box), some fabric, and scrapbook paper.

First I had to cut out the circular portion that housed the DVD. I just used a utility knife to cut around it. But don't do what I did the first time and forget to put something between the plastic and the vinyl sleeve or you will cut all the way through. I'm claiming pregnant brain malfunction.

Then I cut the cardboard into a rectangle that would fit on the side I had just cut the circle from and covered it with fabric to make a pocket. I used mod podge to stick the fabric on to the cardboard, super simple.

Next is the fun part. I made the girl and the outfits for her. If I had more time I might have embroidered some details into the clothes. Maybe next time. The girl is sewn right into the scrap of felt with a blanket stitch. All of the other items were just cut out of felt and fit very nicely in the fabric pocket. Then I used spray adhesive, which is my new best friend, to stick the felt girl and the pocket to the inside of the case. Lastly I used some scrapbook paper I had and embellished it for the outside sleeve.
Cowboy

Princess
Pirate
I really love the portability and durability of this project and Evey seemed to like it so I might need to make one for her. Hopefully her cousin will like it too!

Now that I have started the ball rolling with the DVD cases I am getting kind of excited. I am thinking a mother's day gift is next on the list!

Wednesday, February 15, 2012

Coat Rack

We have a coat closet right across from our front door, but it houses all of Jared's "Army junk" as I refer to it, and we started tossing our coats on the couch as we walked in the front door and it drove me nuts to see them there! So I decided I needed to make a coat rack. I had seen one before that someone had made from an old fence post, but I had no spare fence posts hanging around so I headed to the Home Depot. I found all of the supplies I needed which were a newel post, some shelf supports, and metal coat hooks.

Next came paint. I mixed some white paint with varnish and did two coats on both the post and the "legs". The great thing about these shelf supports is that they already have the hardware attached so I just slid them on to screws that I put into the post. I wish I had thought to take a picture of them so you could see how they work. I have seen picture frames that have this kind of attachment where there is a whole large enough for a nail head to go through on the bottom and then a narrow slit above it so that the nail slides up and won't fall out. Can you picture it?  Lastly I screwed in the hooks.
Here's a close up of the top.

And the finished product. Not bad for a total cost of about $40 huh? You could make it for cheaper if you have a spare post of some sort because that was the big expense at $30.


Wednesday, February 8, 2012

The Suitcases!

I can't remember when or where I saw that someone had used a vintage suitcase to store craft supplies. They had covered it with some crazy craft paper and made it virtually unrecognizable as an old suitcase, but I had better plans. I then became obsessed with finding old suitcases. I looked in the KSL classified adds pretty much daily until I finally found a set that I fell in love with! I begged my husband for them but he just didn't understand the appeal and by the time I talked him into it the suitcases were gone.

Little did I know that my wonderful sister and mom were in cahoots and had gotten the suitcases for me for Christmas. I was so happy Christmas morning when I got them.
Here they are in all their retro glory!

If I had the right decor I probably could have just left them mustard yellow, but they just didn't fit in my house this way. Here comes the spray paint. I got white spray paint specially made for plastic and waited for it to be less than 70% humidity and more than 35 degrees outside which was kind of hard in Washington during December. Finally the day came! I had already taped over all of the hardware, which was the most annoying part, and was ready to go. I probably could have gotten away with two coats of paint but I did three just for good measure.
 What a change huh?! They still looked a little stark to me so I used some silver metallic acrylic paint to antique the edges and around the hardware. I tried to get a good picture to show this, but I just couldn't get one so you'll have to use your imagination. Then I bought some round wooden legs at JoAnn's for around $5 and painted them with the metallic silver. Now I have the most unique looking end table that holds all of  my craft paper, my ribbon, and my paints. Every time I look at these they make me happy.

Bookshelf

A while back I saw this picture on the wonderful Pinterest:
 I was immediately reminded of these black storage shelves that I had. Obviously this photo is from the Internet, I forgot a before picture.

So with my birthday money I went to the Home Depot and bought some really awesome spray paint that gives a hammered steel look. I spray painted all the pieces for the shelf and then assembled it.

Next I bought some sheets of MDF and used my jigsaw to cut them so they would fit on the shelves. I contemplated painting the MDF, which I still may end up doing, but as of now I like the simple look.


 I might add that all I made the covers on all the books, made the decorative balls, painted the suitcase, and recovered the lampshade. But my favorite thing is the blue floral bag on the middle shelf.

Here's why:

I love music, but hate the look of my iPod stand. So I cut a hole in the back of this bag and threaded the power cord though it. Now I can use my remote to turn on my music but now I am the only one who knows were the sound is coming from. Well I guess you know now too :)